Pages

Sunday, November 21, 2010

Staining Recipe: Parisian Essence

Staining Fabric
Often when embroidering, either machine or by hand, to stain your base fabric will give your piece of work another dimension.

Here is a recipe for staining fabric besides utilizing tea or coffee. I have found using Parisian Essence gives a very deep staining. This type of staining is best utilized for work that will not be laundered as there is a chance it may fade considerably. Some textile people advocate it can be set by washing the piece, following staining, in white vinegar or ironing it. This something that needs to be experiamented with.

Parisian Essence is used in cooking to add extra colour to gravies, soups and cakes ect. It can be found generally in the cooking section of your supermarket.

Staining Recipe: Pre wash your fabric in warm water to remove the sizing and then wring out well. In a stainless steel bucket/ trough make up a solution of 75mls of Parisian Essence mixed with 8 litres of hot tap water. Place the fabric in this solution and leave for 10minutes, thou every couple of minutes stir the solution in order that the Parisian Solution dyes all the fabric. After 10minutes remove the fabric and wring out well, leave to dry before use.

Wednesday, November 17, 2010

Christmas Wreath: Suffolk Puff


Another way of using Suffolk Puffs, lightly fill each one with some fibre fill before securing off. Once secured off thread the Suffolk Puffs onto a thin cord with a needle, in this pic approx 18 Suffolk Puffs were utilized, tie off to form a circle. Attach a hanging ribbon, bow and bells.

Sunday, November 14, 2010

Patchwork Christmas Cards


With these two cards l applied vliesofix to the back of pieces of fabric, cut the fabric into small squares.
Iron the squares, overlaping each of them, onto a backing such as an applique sheet or greasedproof baking paper. Peel the newly created fabric square off the backing sheet. Place in a hoop and embroider a design. in these cards l have embroidered a motif from the pfaff designs of patchwork squares. Now cut your design to fit the front of a card. Place the fabric square onto the front of your card, cover with the applique sheet or baking paper and iron with a warm iron til the square has adhered to the card. Add extra sticker embellishments if desired.

Thursday, November 11, 2010

Machine Embelished Quilt Squares


To further embelish these scrap squares l added some decorative stitches from my sewing machine in a matching thread. The third photo is some already embellished squares pieced together, quilt as you go blocks.
Cheers
Suzanne Francis

Tuesday, November 9, 2010

Christmas Coasters / Christmas Tree Decorations

 How cute are these, they can be used a                                                                               as drink coasters or christmas tree decorations To construct take two circles of fabric, place wrong sides together and sew around the edge, about 1/4 inch in. To turn to right side cut a tiny slit in the centre of one of the circles and pull thru, iron the circle. Place a square of fabric in the centre of the circle and fold down the top semi circles from the larger circle and stitch down in place. You may wish to embellish the sqare of fabric as seen in the top photo.
Cheers
Suzanne Francis

Saturday, October 23, 2010

Christmas Cards

Its a bit scary Christmas is just around the corner...blink and it will be here. So to help get you underway for the festive season we have just posted onto the Craft Gate Site the most gorgeous Christmas Card Kit with Instructions. You can purchase the kit with step by step instructions or just the instructions.  http://www.craftgate.com.au/

Saturday, October 16, 2010

Tempting Strawberries

Yesterday l spent a couple of hours making these most gorgeous strawberries. They were made out of Silk Dupion, Calico and Christmas Fabric.

Monday, August 30, 2010

Wash Away Plastic and Fabric Mincing: Part 3

Step 5. The finished piece, the plastic sandwiching the fabric together has been washed away.
Cheers
Suzanne Francis

Wash Away Plastic And Fabric Mincing: Part 2.

Step 3. Here we see the fabric scraps sandwiched between two layers of Wash Away Plastic, pinned and hooped ready to be free motioned machined.


Step 4. The finished work, note how the machine stitches overlap, that ensures that all the pieces hold together once the plastic is washed away in warm water.
Cheers
Suzanne Francis

Sunday, August 29, 2010

Wash Away Plastic And Fabric Mincing.

Step 1.Today l just added the most amazing product to my store, it is "Wash Away Plastic." Under the tips and Techniques section you see one of the ways it can be utilized...to create your own fabric from scraps.


                                                                                                                                                                                                                                                   Step 2. Here we can see the scraps of fabric sandwiched between the two layers of wash away fabric, ready to be free motioned machined together.

Friday, August 13, 2010

Japanese Fabric Trims.

The japanese fabrics were so gorgeous l couldnt throw away the the trimings from each piece...now the challenge is what shall l do with them....?????
Cheers
Suzanne Francis

Wednesday, August 11, 2010

Utilizing Scraps Of The Scraps

But what does one do with the scraps of the scraps....crazy patchwork....these are diary covers that l designed. Great for covering those un attractive notebooks one always seems to accumulate.
Cheers
Suzanne Francis

Scraps From A Thimbleberries Quilt

This scrap quilt was made from scraps of a Thimbleberries Quilt l made in 2000. I luv the combination of these colours , they are of a tea washed appearance. The outer boarders are just straight cut fabrics, the next series of boarders are blocks constructed of two parallel pieces that then have a boarder placed around them. The inner aspect of this quilt is rows of small squares of fabric, alternating rows of thin and then wider. A design that just developed and grew of its own accord. A ture scrap quilt.
Cheers
Suzanne Francis

Saturday, July 31, 2010

Scrap Quilt: Part 8

The completed square is now cut down to a 5" square.
Cheers
Suzanne Francis

Scrap Quilt: Part 7

The square of calico is now covered in strips.
Cheers
Suzanne Francis

Scrap Quilt: Part 6

The rest of the square is now being completed.
Cheers
Suzanne Francis

Scrap Quilt: Part 5.

A second piece of fabric is placed over the top , right sides together.
Cheers
Suzanne Francis

Scrap Quilt: Part 4.

Step 1. Involves placing a longer scrap of fabric along the center of the square. Cheers          Suzanne Francis  

Thursday, July 29, 2010

Where The Scrap Fabrics Came From.

This is the quilt from where the remenant pieces originated from. Its called "Trellis Garden" in total l have made 4 of these quilt tops, they are still yet to be quilted.
Cheers
Suzanne Francis

Scrap Quilt: Part 3.

The next step is to is to prepare the top fabric. These remanat pieces have been cut into strips of varying widths, 1", 1.1/2" and 1.1/2".
Cheers
Suzanne Francis

Wednesday, July 28, 2010

Scrap Quilt: Part 2.

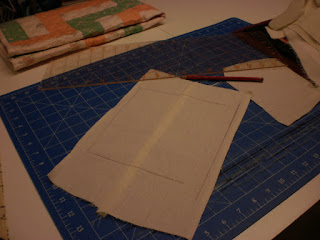
  • Being a true scrap quilt even the backing fabric for each of the individual blocks are scrap pieces of calico saved from other sewing projects. In this photo l have sewn together two pieces of calico. As each square will be 5" x 5"  l have drawn a bigger square, 7' x 7" in pencil on the backing calico. the next step is to cut out this square....l now have my backing fabric ready.
  • Cheers
  • Suzanne Francis

Saturday, July 10, 2010

Scrap Quilt: Part 1.

Over the next few postings l shall illustrate the construction and joining of such squares into the beginnings of a quilt. The photo shows the fabrics that will be utilized for this series of blocks.
Cheers
Suzanne Francis

Scrap Quilts Using Old Jeans.

Here is a quilt constructed of squares that have been joined with bindings...the denin fabric used in this quilt is from the discarded jeans of my daughters.
Cheers
Suzanne Francis

Scrap Quilt Blocks

Here is a layout of scrap squares, these will be joined with bindings.
Cheers
Suzanne Francis

Utilizing the scraps of the scraps

to utilize the last of my scraps l create these 5" x 5"
squares... l plan to join these squares with bindings, creating a quilt as you go. This method also eliminates the need to quilt the final piece.
Cheers
Suzanne Francis

Wednesday, June 30, 2010

My Scrap Quilts.


Today l have survey all my patchwork fabrics...no matter how many scrap quilts l make my fabric pile just seems to grow...thou nothing more theraputic than to go thru ones fabrics and sort and refold...like meeting up with old friends.
Cheers
Suzanne Francis


Monday, June 28, 2010

Begining Of A Patchwork Journey.

hi,
l hope you enjoy this blog which will be updated regularly with lots of craft ideas..including my favourite patchwork and sewing tips and techniques.
Cheers
Suzanne Francis