Pages

Sunday, December 9, 2012

Block Of The Month: Log Cabin


Block Of The Month: Log Cabin
 

Instructions
N.B. All seams are ¼” in widith
Step 1: Cut 4 squares 1 ¼”x 1 ¼”
Step 2: Cut strips of fabric, of your 2 chosen colours, 1 ¼" wide.
Step 3: Sew your first piece of strip along aside the square
After each strip has been sewn into place you will need to iron flat.

Step 4: Sew your second piece of of fabric strip along the next side of the square. This will include going along the top of the first strip of fabric. These 2 strips are of the same colour.
Step 5:  Now with the 2nd coloured strips of fabric continue to proceed around the square as per the following photos

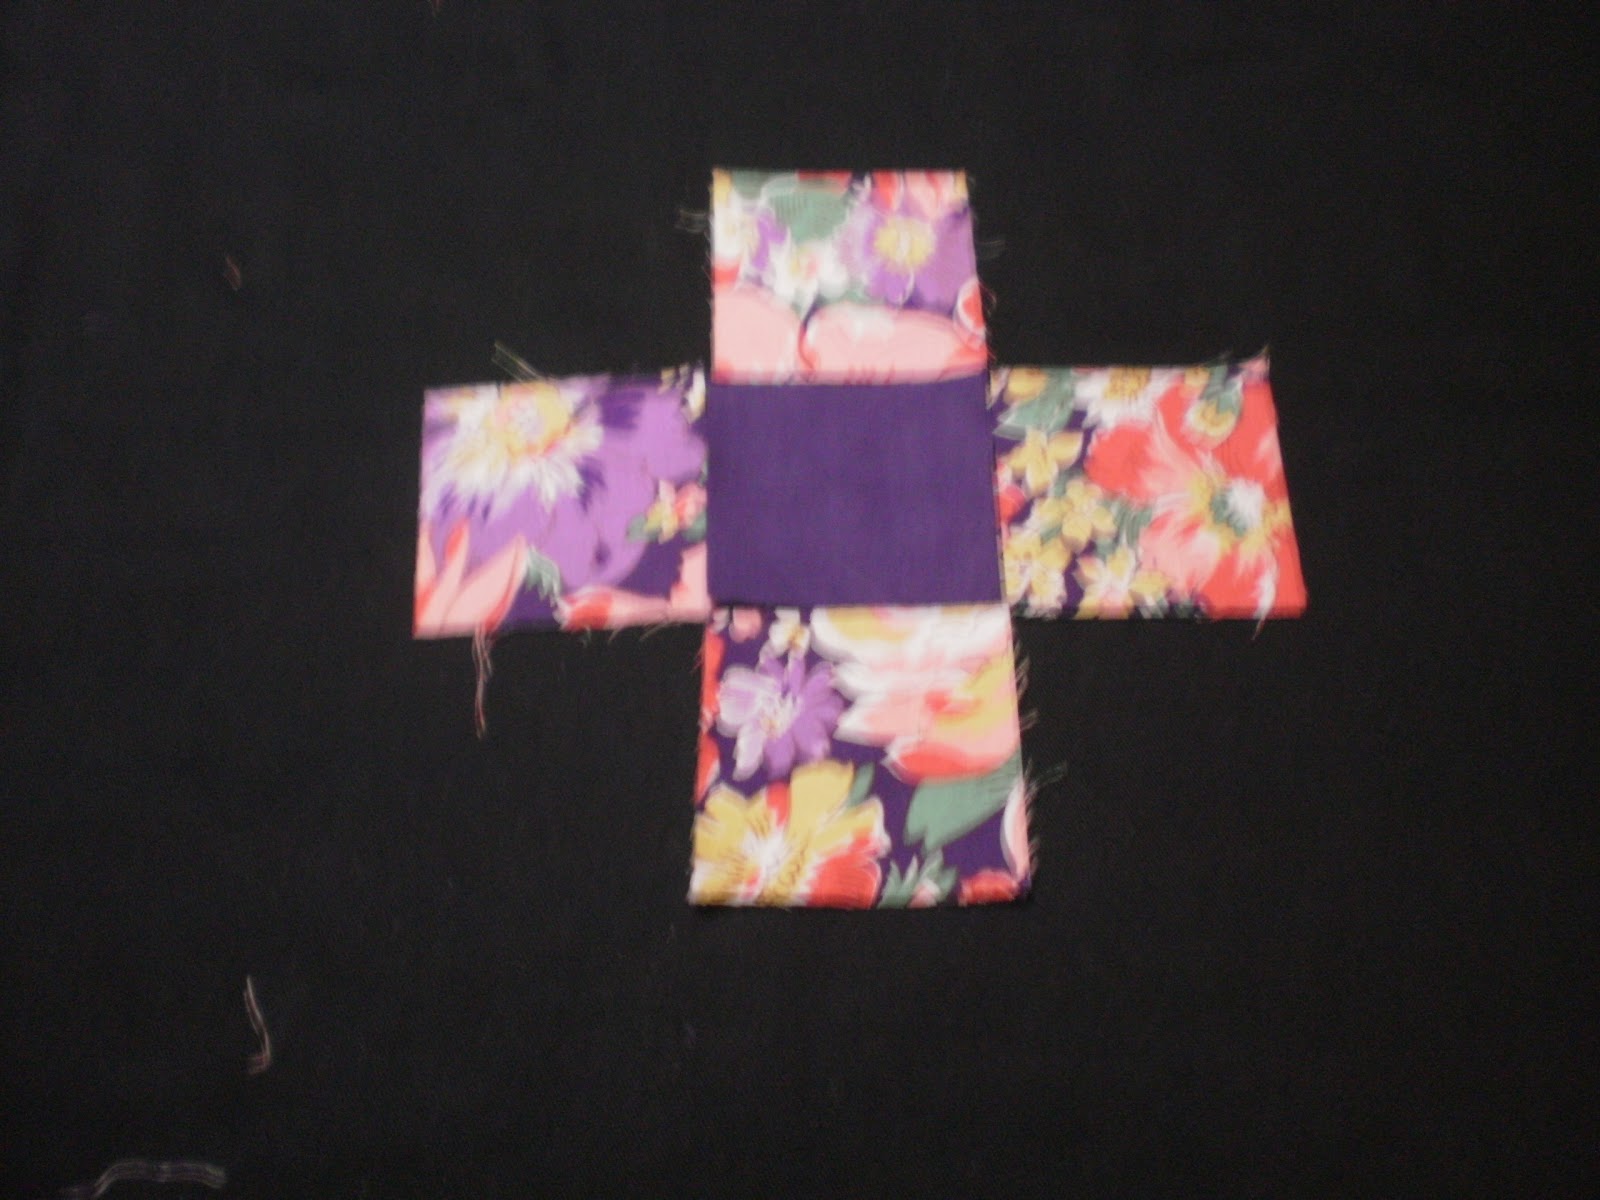
Once you have finished the first round you will need to trim the edges so that each strip measures an exact 1” in widith

Step 6: Commence the second round in the same manner as the first round.


Step 7:Complete the third round in the same manner.

Do remember to trim around the edges once the second round is complete...that the widith of each strip is 1"

Step 8: Complete 3 more squares in the same manner.

Step 9: Sew the 4 completed sqares together in the following manner.


Step 9: Sew the 4 completed sqares together in the following manner.
Step 10: Completed Block.
 An example of a quilt design utilizing a log cabin block


Friday, November 16, 2012

Scrap Quilt Pattern

Scrap Quilts
“What Does One Do With All Those Tiny Misfit Scraps Of Fabric?”

The fabric for this quilt was gathered in charm packs from members of a quilt group l attend. This particular year as our birthdays came around we would receive, from other members of the group, 10 squares 5” x 5” of the worst fabric they had in their stash.

Combined with a variety of off cuts of plain blue fabric and tiny scraps l constructed a pile of snowball squares and a pile of nine patch squares.

The next step involved making up rows of alternating nine patch and snowball blocks.

As the rows were sewn together there was always a nine patch block above and below the snowball block.

Thus the number of scrap squares you construct will determine the finished size of this quilt.

A true scrap quilt.


Saturday, May 5, 2012

Block Of The Month: Around The World


Block Of The Month

“Around The World”


This block is constructed of squares 2 1/4inches in size. It is the placement of the different rounds of colour that leads to the name “Around The World”

Step 1: Cut 4 strips, lengthwise across the fabric, 2 1/4inches wide. 4different colours are utilized for this block.


Step2: Cut each strip into 2 1/4inch squares.


Step 3: Lay down your centre block and 4 blocks around it, as per picture.


Step 4: Continue to lay squares of fabric around the middle square as per the following pictures.


Step5:


Step 6: After the 3rd round the corners need to be filled in...as per the following pictures.


Step 7: Your block laid out will resemble to some degree the following picture.

Step 8: Each row will need to be sewn together, sew each block of the row together with a straight stitch and a 1/4inch seam


:Step 9: Once all blocks have been sewn into rows the rows need to be sewn together utilizing a 1/4inch seam.

Hint: When sewing the seams together always have the seams in the first row going 1 way as in the first photo the seams are going to the right. Then in the next row the seams are going in the opposite direction,to the left. This helps ensure the seams met neatly on the front of your quilt, as in photo 3. Also ensures there are no lumpy intersections on the front of your quilt which can distort the final quilting process and you will not have a flat laying quilt.


1.    2.

3.


Friday, March 2, 2012

Block Of The Month; Railway Fence; 6inch block

I have had a enquiry from a fellow patchworker who wishes to make smaller blocks for block of the month the fabric cuts for a 6 1/2inch block that will be 6inches when sewn into the sampler are as follows. Cut the 3 strips of fabric required 1 1/2 inches wide and sew together as per instructions. Then cut this new strip into 3 1/2 inch blocks. Sew these blocks together as per instructions
Do let me know how it goes, l shall endevour to work the other blocks as 12 inch blocks and 6 inch blocks.....now you have really set me a challenge.

Saturday, February 18, 2012

Railway Fence Variations


These three quilts show how you can sew 3 strips of fabric together, cut into 6 1/2 inch blocks and create a variety of different patchwork designs. The 2 peach coloured quilts were made from furnishing fabrics bought at a garage sale and the pink quilt the fabric is a polyester fabric.


Saturday, February 11, 2012

Sampler Quilt

Block 1: Rail Fence.


This is a great block to start the sampler with and your patchwork journey if you are a beginner. The skills you will learn thru this block are the cutting of fabric with a rotary cutter and ruler, sewing ¼ inch seams, matching up a seam and sewing 3 rows of fabric together.

To support the instructions l have included photos. But do remember any question you may want to ask please go to the Craft Gate yahoo group. There you will meet other Block Of The Month participants and l will be visiting regularly http://groups.yahoo.com/group/craftgate/

Don’t forget a vast array of your patchwork and craft equipment needs can be purchased online thru the Craft Gate website; www.craftgate.com.au Craft Gate proudly supports the TV show Suzan Is Craft which is seen on Channel 31 thru out Melbourne, Sydney from 4th March and shortly Adelaide and Brisbane. For write ups re the TV show and guests interviewed do visit the blogs http://suzaniscraft.wordpress.com/ and http://craftingblogger.blogspot.com.au/

Step 1. By now many of you will have gathered your fabric, here are photos of my fabric choices. The floral fabric in the first photo is my main fabric with the next photo showing the support fabrics and the final photo is of my plain background fabric.


Step 2. This involves cutting your fabric so the equipment needed is the cutting board, rotary cutter and Perspex ruler. Choose the 3 fabrics you wish to work with for this block, iron and fold into 4 lengthwise. Place the fabric onto the cutting board, lining up the fold of the fabric with one of the horizontal gridlines on the cutting board. Place the perspex ruler towards the edge of the fabric, again lining one of the horizontal lines on the ruler with the fold of the fabric. At this point using the rotary cutter and cutting away from you trim off the uneven fabric edge (photo 3 and photo 4)


Now to cut your strip of fabric turn the cutting board around, so that the trimmed edge is facing your left side. Refer to the following photo. Now place your ruler 2 1/2 inches in from the edge of the fabric. With the fingers of your left hand hold the ruler in place (ENSURE YOUR FINGERS ARE WELL AWAY FROM THE EDGE OF THE RULER) and holding the rotary cutter in your right hand and at a 45 degree angle run the flatter side of the cutting blade along the side of the ruler travelling away from you. This results in the fabric being cut. Always close your blade once finished cutting due to the sharpness of the blade.

Cut another two strips of the same measurement, one each from the other two fabrics.


If you are left handed cut the opposite way around.

Step 3. This step involves sewing the 3 strips of fabric together. As in many patchwork designs the seams for this block are ¼ inch, straight stitch and with cotton thread. When sewing strips together sew down one way and then back up the other way. If all strips are sewn together in the same direction an arch will form thus creating an impossible piece to use. The piece needs to be ironed at this stage, as in many patchwork pieces iron the seams together and in one direction. If you have a strip of light coloured fabric always iron the seams towards the darker coloured fabric.


Step 4. Place the ironed strip on your cutting board and with your ruler trim off one end. Then measure in 6 1/2 inches with your Perspex ruler and cut with the rotary cutter. We need 4 of these blocks.


Step 5. Sew the two sets of the blocks together, as per photo, using a ¼ inch seam.


Step 6. Sew the two sets of blocks together. In this step the centre seams need to be matched with seams on top blocks going in one direction and the centre seam on the bottom blocks going in the other direction. Thus avoiding bulk forming and being noticeable in the finished project.


The finished block will measure 12.5 inches x 12.5 inches


Saturday, February 4, 2012

Patchwork Sampler; Block Of The Month.


Patchwork Sampler.

Before you begin.

Over the next few pages we will look at some of the equipment you may need to commence your patchwork journey. There are some basic equipment needs that are musts while others you can add to as you progress.

1/ Sewing Machine: A basic sewing machine is all on needs if you decide to machine sew your quilts. The major requirement of your machine is that it does straight stitch. It would also be helpful when you come to quilt your quilt that the machine can accomadate a walking foot or alternatively can drop the feed dogs and utilize a darning foot.

To view needles for your sewing machine click on the following link http://www.craftgate.com.au/products/Packet-of-Assorted-Universal-Machine-Needles.html

2/ Thread: Many quilters prefer to use a good quality cotton thread in the sewing machine and for the hand quilting process. Thou a good quality polyester-cotton thread can also be utilized. The colour of the thread used is important, try to match the thread colour to the fabric colour. If using a variety of coloured fabrics match the darkest colour fabric with your thread. To view thread range please click on the following link http://www.craftgate.com.au/categories/Threads/Gutermann-Threads/

3/Pins: These will assist in holding the various pieces of fabric together until machine sewn. It is fine to use smaller, fine pins for this process and the longer Quilting pins when pinning the 3 layers, quilt top & wadding & backing, together. To view our range of pins please click on the following link http://www.craftgate.com.au/categories/Haberdashery/Needles-and-Pins/

4/Rotary Cutters: Rotary Cutters make cutting your fabric, especially when cutting multiple layers, a lot easier and very accurate. There are a variety of cutters on the market and it really is a case of trying the different ones available i.e if possible try out your fellow patchworkers, cutters before buying a expensive one. Besides a wide range of styles there is also a variety of sizes, 45mm is the most utilized size. When using a rotary cutter a Quilters Ruler should always be utilized as well. The depth of the quilters ruler ensures the rotary cutter is less likely to stray and cut fingers. To view our range of rotary cutters please click on the following link http://www.craftgate.com.au/categories/Scissors-And-Rotary-Cutters/

5/ Cutting Mats: These mats are specially designed to be used with the rotary cutter. They are often referred to as self healing in that if marked by the rotary cutter the mark will disappear. Don’t use other types of cutting tools on this mat as they will permantly mark these mats. Also never leave your mat in a hot car as once these mats buckle it can never be reversed thus rendering the mat useless. A good sized cutting mat to start off with is 23in x 17in.

6/Quilters Rulers: A quilters ruler is made of, usually, clear acrylic. This allows the user to see the fabric to be cut clearly and thus cut straight lines everytime. As there are many diff sized rulers available a good size to start with is 14in x 4 1/2in. The markings on the ruler should include 1/4in markings and 45 and 60 degree angle markings.

6/ Scissors: A good pair of fabric cutting with sharp points and another pair for cutting paper. To view our range of scissors please click on the following link http://www.craftgate.com.au/categories/Scissors-And-Rotary-Cutters/

7/Fabric: Many quilters utilize 100% cotton for their projects due to its softness, tightness of weave thus not a fabric that distorts its shape easily and the straightness of the grain due to its tighter weave.

Preparation Of Fabric: Many quilters prefer to pre wash their fabric prior to use as this pre shrinks the fabric and rids the fabric of any loose dye.

Selecting Fabric: When choosing fabric for a sampler quilt l tend to choose my main fabric first. The main fabric is usually a busy print. From this fabric l will identify approx 3 colours within the design and choose fabrics of a less busy nature of those 3 colours. These three colours/fabrics become your support colours. The final fabric to choose is your background colour, this colour is pale, of one tone or a tone on tone. This fabric recedes into the background when viewing the completed quilt.

Fabric Amounts: This is a rough estimate only for a lap quilt i.e. 12 blocks, 12inchs x 12 inches. Main Fabric and Background Fabric each 1 1/2 yards or 140cms, Support Fabrics x 4, 4 fat quarters.


Wednesday, January 25, 2012

For those who may be contemplating joining us for the BOM series thru out 2012 here is a sampler quilt l constructed a couple of years ago There are a few close up shots of two of the individual blocks. The blocks prior to having the boarders added were approx 12" or 30cm in size. In this quilt l utilize sample pieces of furnishing fabric and sheeting fabric for the boarders/shashings. I didnt wash the fabric prior to use so consequently after the first wash the fabric did shrink a small amount thus giving the quilt a very ruffled/rippled appearance which l quiet like. The first block and associated start up information will be published the second week of February so l do hope you will join us each month for a different BOM.
Cheers
Suzanne


Saturday, January 21, 2012

Today l sat for a few hours and made some fabric cards, see pics in the file section.They were such an easy project to complete and a great way to use up some special scraps of fabric. These scraps of fabric were from fabrics l had bought in London at a Craft expo held at the Alexandra Palace in 2007 and some Laura Ashley piecs l had bought in London. First l ironed my backing fabric onto a very heavy vilene, then arranged my pieces of fabric ontop of the backing fabric. Then over this top layer l placed a piece of netting or sheer chiffon and with a contrasting thread free motioned machined over the piece of work. The next step involved cutting the piece to a postcard size and ironing onto the back a piece of calico. The calico adhered to the backing as l had pre ironed some Vliseofix to it. The hot iron ensured the Calico fabric with the Vliesofix layer would adhere to the back of the postcard.

The final step involves running a close wide satin stitch around the edge of the card.
Now you have a card that can be sent thru the mail or kept as a memento of a special time.

Friday, January 13, 2012

Talking About "Wash Away " Plastic


Heres a project that lve had on the go for awhile, a great way to utilize some of those smaller pieces of vibrant fabrics one doesnt want to throw away . The blue piece, above, is the finished result.


The above green piece is a work in progress.


Step 1. Chose a backing fabric, in this case lve chosen calico and stiffen it with a lightweight iron vilene.
Step 2. Collect your fabric pieces, in a particular colour theme. Lots of different textures evident here.
Step 3. Arrange your fabric pieces in a pleasing manner ontop of the backing fabric, within a A4 size.
Step 4. Cover with " Wash Away" Pastic and pin in place.
Step 5. Set your machine for free motion machine embroidery. Embroider your fabric piece, in my pieces l utilized a meandering stitch. A great way to become familiar/pracrice your free motion machine skills.
Step 6. Further embellish with some solid free motion stitch work.
Step 7. Cut your piece of work down to a A4 size
Step 8. Satin stitch around the eges of your project
Congratulations you now have a unique piece of textile work.
Another thought us that you could cut you work down to a postcard size and create your own personalized postcards or Artists Trading Cards.